This Easter, ditch the gluten and embrace the delightful challenge of baking heavenly hot cross buns! Imagine the warm, yeasty aroma filling your kitchen as you craft these iconic treats, perfectly adapted for those with gluten sensitivities. We’ll guide you through selecting the ideal gluten-free flour blend, ensuring a texture that rivals traditional recipes. From mastering the art of gluten-free yeast activation to achieving that signature cross, every step will be meticulously detailed, complete with stunning visuals to inspire your baking journey. Prepare for a taste of Easter tradition, reimagined for a delicious, inclusive celebration.
This comprehensive guide delves into the intricacies of creating perfect gluten-free hot cross buns, exploring various flour blends, yeast techniques, and creative glaze options. We’ll uncover the secrets to achieving that signature soft crumb and the perfect cross, ensuring your Easter breads are not only delicious but also visually stunning. Whether you’re a seasoned baker or a curious novice, this guide will empower you to create unforgettable Easter treats.
Adapting Traditional Hot Cross Bun Recipes

Converting a beloved traditional hot cross bun recipe to a gluten-free version requires careful consideration to maintain the characteristic texture and flavor. The key lies in finding the right gluten-free flour blend that mimics the elasticity and structure provided by wheat flour, and in adjusting the liquid content to compensate for the different absorption properties of gluten-free flours. Sweetness and spice levels can be tweaked to suit individual preferences, but the overall goal remains a soft, slightly chewy crumb with a delightful warming spice profile.
Gluten-Free Flour Blend Selection
The foundation of any successful gluten-free hot cross bun recipe is the flour blend. Many commercially available blends are designed specifically for bread making and contain a combination of starches (such as tapioca or potato starch) and gluten-free flours (like rice flour, brown rice flour, and sorghum flour). The ideal blend will offer a balance of structure, moisture retention, and a light crumb. Experimentation may be needed to find the perfect blend for your preferred taste and baking conditions. For instance, a blend heavy in tapioca starch might yield a slightly more tender crumb, while a blend with a higher proportion of brown rice flour might result in a denser, chewier texture. Careful attention should be paid to the manufacturer’s instructions, as the optimal liquid ratio may vary between brands.
Three Variations of Gluten-Free Hot Cross Bun Recipes
Three distinct approaches can yield excellent gluten-free hot cross buns.
- Recipe 1: The Classic Approach This recipe relies on a standard gluten-free bread flour blend, emphasizing simplicity and a familiar taste and texture. The focus is on achieving a soft, slightly sweet crumb reminiscent of traditional hot cross buns. The addition of xanthan gum or psyllium husk powder helps to bind the ingredients and create a more cohesive dough. A touch of orange zest adds brightness, while a blend of warming spices – cinnamon, nutmeg, and cloves – provides the characteristic hot cross bun flavor.
- Recipe 2: The Nutty Delight This variation incorporates finely ground nuts, such as almonds or walnuts, into the flour blend. The nuts add a pleasant nutty flavor and contribute to a richer, more textured crumb. The addition of a touch of maple syrup enhances the sweetness and provides a subtle caramel note. This recipe is particularly suited for those seeking a more substantial and flavorful bun.
- Recipe 3: The Fruity Fusion This recipe highlights the incorporation of dried fruits, such as raisins, currants, or cranberries, directly into the dough. The fruits add moisture, sweetness, and textural complexity. A touch of orange juice in the dough enhances the flavor and helps to plump the dried fruits. The addition of a small amount of gluten-free beer or ale can also improve the texture and flavor of the finished buns.
Step-by-Step Guide for Making Gluten-Free Hot Cross Buns
This guide focuses on a classic approach, using a pre-made gluten-free bread flour blend.
- Mixing the Dry Ingredients: In a large bowl, whisk together 4 cups of gluten-free bread flour blend, 1/4 cup granulated sugar, 1 teaspoon baking powder, 1 teaspoon baking soda, 1 teaspoon ground cinnamon, 1/2 teaspoon ground nutmeg, 1/4 teaspoon ground cloves, and 1 teaspoon salt. The mixture should be light and fluffy, with all ingredients evenly distributed.
- Combining Wet Ingredients: In a separate bowl, whisk together 1 cup of warm milk (around 105-115°F), 1/4 cup melted unsalted butter, 1 large egg, and 1 teaspoon vanilla extract. The mixture should be smooth and well combined.
- Creating the Dough: Gradually add the wet ingredients to the dry ingredients, mixing with a wooden spoon or spatula until just combined. The dough will be slightly sticky but should hold its shape.
- First Knead: Turn the dough out onto a lightly floured surface and knead gently for 2-3 minutes. The dough will be softer and less elastic than traditional wheat dough, with a pale, slightly sticky appearance.
- First Rise: Place the dough in a lightly oiled bowl, turning to coat. Cover with plastic wrap and let rise in a warm place for 1-1.5 hours, or until doubled in size. The dough will have a noticeably softer, airier texture after the first rise.
- Shaping the Buns: Punch down the dough to release the air. Divide the dough into 12 equal portions and shape each into a ball. Place the buns on a baking sheet lined with parchment paper, leaving some space between them.
- Second Rise: Cover the buns loosely with plastic wrap and let rise for another 30-45 minutes, or until almost doubled in size. The buns will puff up significantly during this second rise.
- Baking: Preheat oven to 375°F (190°C). Bake for 20-25 minutes, or until golden brown. The buns will be nicely browned and spring back gently when lightly pressed.
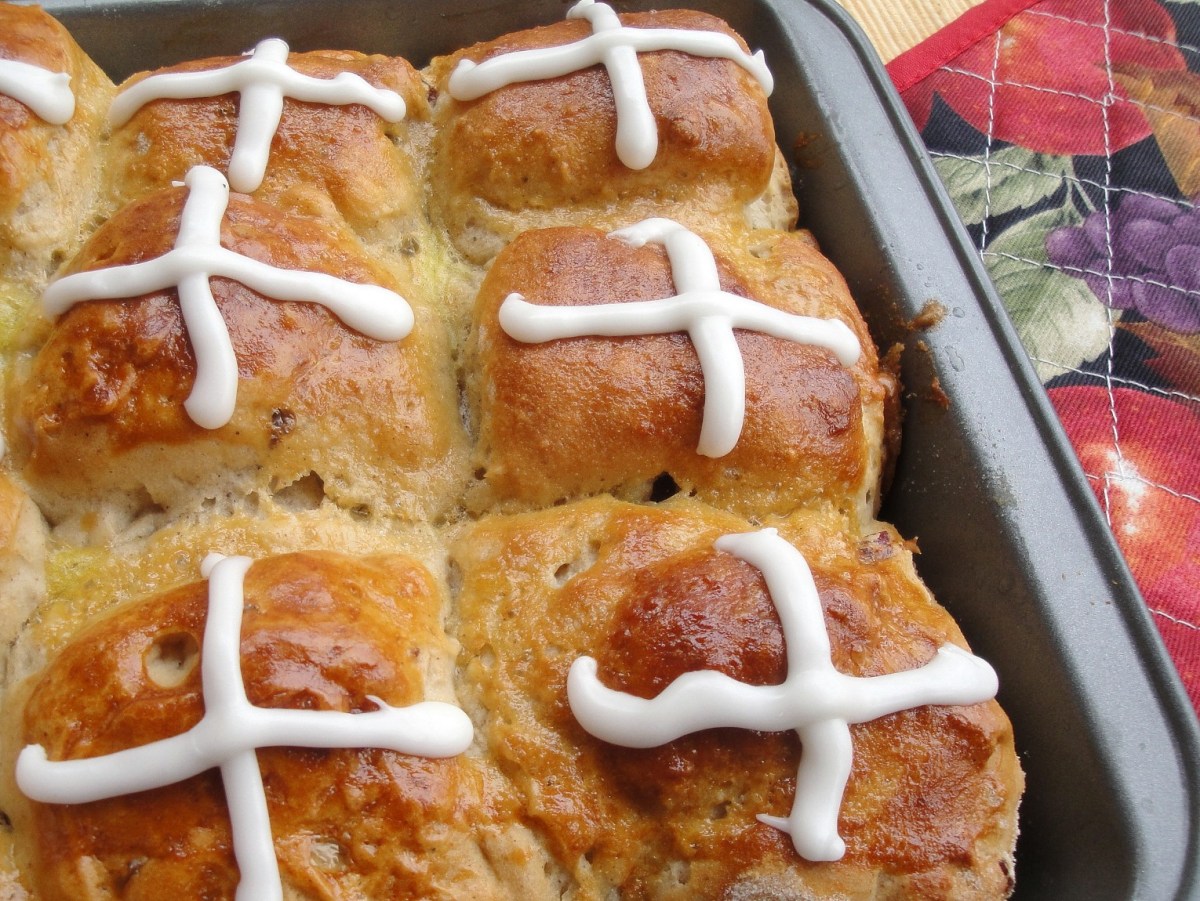
- Making the Cross: While the buns are baking, prepare a simple icing by mixing powdered sugar with a little milk or orange juice to create a smooth, pipeable consistency. Once the buns are cool, pipe a cross onto each one.
Gluten-Free Yeast and Rising Techniques
The success of gluten-free Easter breads, like hot cross buns, hinges on understanding the unique challenges posed by gluten-free flours and mastering yeast activation and rising techniques. Gluten, the protein in wheat flour, provides structure and elasticity to dough, allowing for a robust rise. Gluten-free flours lack this structural protein, making them prone to collapsing or producing dense, heavy breads. Careful selection of yeast, proper proofing, and the addition of binding agents are crucial for achieving a light and airy final product.
Gluten-free flour blends often absorb liquids differently than wheat flour, impacting yeast activity. Some flours might absorb too much liquid, creating a dough that’s too wet and inhibiting yeast growth. Conversely, others might be too dry, resulting in insufficient hydration for optimal yeast function. Understanding these variations and adjusting liquid amounts accordingly is essential. Furthermore, the lack of gluten means that the dough lacks the elasticity to trap the gases produced by the yeast during fermentation, leading to a less impressive rise. Careful manipulation of the dough and the addition of ingredients like xanthan gum or psyllium husk can help compensate for this.
Gluten-Free Yeast Options and Their Effects
Different types of yeast can influence the final texture and flavor of gluten-free breads. Active dry yeast, instant yeast, and fresh yeast are all viable options, each presenting unique characteristics. Active dry yeast requires rehydration before use, which allows for a better assessment of its viability before incorporating it into the dough. Instant yeast, on the other hand, can be directly added to the dry ingredients, simplifying the process. Fresh yeast, with its higher moisture content, provides a more immediate and potent rise, but requires careful handling and precise measurement due to its short shelf life. The choice of yeast will influence the fermentation time and the overall flavor profile of the bread. For instance, active dry yeast might impart a slightly more complex flavor, whereas instant yeast may produce a slightly milder taste. The texture can also vary, with some yeasts producing a slightly chewier crumb than others. Careful experimentation with different yeast types is encouraged to determine personal preference and optimal results for a specific gluten-free flour blend.
Proofing Gluten-Free Yeast
Proper proofing is vital for ensuring the yeast is alive and active before mixing it into the dough. This involves rehydrating the yeast (for active dry yeast) in warm water with a pinch of sugar. The sugar provides food for the yeast, encouraging rapid growth. A successful proof is indicated by a foamy, bubbly mixture. The mixture should visibly increase in volume, almost doubling in size, and have a slightly sweet, yeasty aroma. The time required for proofing will depend on the type of yeast and the temperature of the water. If the mixture remains inactive or produces an unpleasant odor, the yeast is likely dead or compromised and should be discarded. Visual cues are paramount – a noticeably foamy and bubbly mixture, expanding to nearly double its initial volume, indicates readiness. A flat, inactive mixture, on the other hand, suggests the yeast is not viable and should be replaced. This proofing step is critical for achieving a proper rise in the final product. Without properly proofed yeast, the dough may not rise sufficiently, resulting in a dense and disappointing loaf.
Creating the Signature Hot Cross Bun Cross
The iconic cross atop a hot cross bun is more than just decoration; it’s a symbol of the Easter season and a crucial element of the bun’s visual appeal. Achieving a perfect cross, especially with gluten-free dough, requires careful consideration of technique and the right tools. This section will explore three distinct methods for creating this signature mark, analyzing their pros and cons to help you choose the best approach for your baking style.
Piping the Cross
Piping a cross offers a precise and elegant result. A pastry bag fitted with a small, round tip allows for controlled application of a contrasting glaze or batter. For a classic look, use a simple, slightly thick white icing piped in a bold, slightly uneven cross shape. This creates a rustic charm that contrasts beautifully with the golden-brown surface of the buns. Alternatively, a thinner line can achieve a more delicate appearance. The texture is smooth, with a slight sheen depending on the glaze used. A milk-based glaze will offer a subtle creaminess, while a simple egg wash provides a glossy finish.
Glazing the Cross
This method uses a simple glaze to create a cross. The glaze, typically a thinned-down icing or a simple egg wash, can be applied directly to the buns using a toothpick, knife, or even a small paintbrush. This offers the greatest level of flexibility in terms of design. For a visually striking effect, use a contrasting color glaze – perhaps a deep chocolate glaze on a lighter bun or a vibrant berry glaze for a pop of color. The texture can vary depending on the glaze used; a simple egg wash will provide a glossy sheen, while a thicker icing will result in a more textured surface. The thickness of the lines can range from thin and delicate to bold and substantial, depending on the application technique.
Stamping the Cross
A hot cross bun stamp is a simple and effective way to create a uniform cross on multiple buns simultaneously. These stamps are typically made of wood or metal and come in various sizes and designs. The cross created by this method is usually bold and crisp, with clearly defined lines. The texture is generally smooth and even. The stamp can be dipped in a glaze or icing for a more pronounced cross or used directly to imprint the dough. This creates a more textured cross on the surface of the bun. A larger stamp will create a bolder, more prominent cross, while a smaller stamp will result in a more subtle impression.
Comparison of Cross-Making Methods
Choosing the best method depends on your desired aesthetic and level of skill.
- Piping:
- Advantages: Precise control, allows for varied thicknesses and designs, elegant appearance.
- Disadvantages: Requires some skill with a piping bag, can be time-consuming for large batches.
- Glazing:
- Advantages: Simple and easy, requires minimal tools, allows for creative designs and color variations.
- Disadvantages: Can be less precise than piping, may require multiple applications for bolder crosses.
- Stamping:
- Advantages: Fast and efficient for large batches, creates uniform crosses, simple to use.
- Disadvantages: Limited design options, requires a specialized tool, may not be suitable for all dough types.
Baking gluten-free hot cross buns may seem daunting, but with careful attention to detail and the right techniques, the results are truly rewarding. The journey, from selecting the perfect flour blend to perfecting the iconic cross, is filled with opportunities for creativity and delicious experimentation. This guide has equipped you with the knowledge and confidence to create stunning, flavorful gluten-free Easter breads that will impress your friends and family, proving that delicious and allergy-friendly can perfectly coexist. So, gather your ingredients, embrace the process, and enjoy the sweet satisfaction of creating your own gluten-free Easter masterpiece.
FAQ Guide
Can I use any gluten-free flour blend?
While many blends work, some are better suited for hot cross buns than others. Look for blends with a good balance of starches and proteins for optimal texture and rise.
How do I store leftover hot cross buns?
Store leftover buns in an airtight container at room temperature for up to 3 days, or freeze them for longer storage. Reheat gently in the oven or toaster before serving.
What if my gluten-free dough doesn’t rise properly?
Ensure your yeast is fresh and properly activated. The type of gluten-free flour blend can also affect rising; some blends require longer proofing times.
Can I make the buns ahead of time?
Yes, you can shape the buns and refrigerate them overnight before baking. This allows for a slower, more even rise.


