Craving a crunchy, wholesome breakfast that aligns with your paleo lifestyle? Forget store-bought granola, often laden with refined sugars and questionable ingredients. This guide unveils the secrets to crafting your own delicious, nutrient-packed paleo granola at home. From selecting the perfect blend of nuts and seeds to mastering the art of achieving that perfect golden-brown crispness, we’ll empower you to create a granola that’s both satisfying and health-conscious.
We’ll walk you through a simple, step-by-step recipe, exploring various customization options to suit your taste preferences and dietary needs. Discover the nutritional powerhouses within each ingredient, understand the nuances of different sweeteners, and learn how to store your homemade granola to maintain its freshness for weeks to come. Prepare to embark on a culinary journey that will redefine your breakfast experience!
Ingredient Selection for Paleo Granola

Crafting the perfect paleo granola hinges on selecting the right ingredients. The foundation lies in choosing nutrient-dense nuts, seeds, and a touch of natural sweetness. This careful selection ensures a delicious and wholesome treat that aligns with paleo principles, while delivering a satisfying crunch and a boost of essential nutrients. Understanding the nutritional profile of each ingredient is crucial to maximizing the health benefits of your homemade granola.
Paleo Granola Ingredients
The following table details the key ingredients for a delicious and nutritious paleo granola, along with their nutritional benefits. Remember that quantities can be adjusted to your preference and dietary needs.
| Ingredient | Quantity (example for a large batch) | Nutritional Information (per 100g – approximate values) | Notes |
|---|---|---|---|
| Almonds, slivered | 1 cup | ~600kcal, 50g fat, 20g protein, 20g carbs | Provides healthy fats, protein, and vitamin E. Choose raw, unsalted almonds for optimal health benefits. |
| Walnuts, chopped | ½ cup | ~650kcal, 65g fat, 15g protein, 10g carbs | Rich in omega-3 fatty acids, antioxidants, and fiber. Their slightly bitter taste adds depth to the granola. |
| Pumpkin Seeds | ½ cup | ~550kcal, 45g fat, 30g protein, 25g carbs | Excellent source of magnesium, zinc, and iron. Their slightly nutty flavor complements other ingredients. |
| Sunflower Seeds | ¼ cup | ~580kcal, 50g fat, 20g protein, 20g carbs | Good source of vitamin E and selenium. Adds a slightly sweet and nutty flavor. |
| Coconut Flakes, unsweetened | ½ cup | ~590kcal, 55g fat, 4g protein, 15g carbs | Adds a tropical sweetness and a pleasing texture. Choose unsweetened flakes to control sugar intake. |
| Chia Seeds | 2 tablespoons | ~480kcal, 30g fat, 17g protein, 30g carbs | Excellent source of omega-3 fatty acids, fiber, and antioxidants. Adds a subtle, earthy flavor and helps bind the granola. |
| Maple Syrup (or Honey) | ¼ cup | ~250kcal, 0g fat, 0g protein, 65g carbs | Provides natural sweetness and binds the ingredients. Use sparingly to control sugar intake. |
| Coconut Oil | 2 tablespoons | ~300kcal, 30g fat, 0g protein, 0g carbs | Adds moisture and helps create a crispy texture. Use refined coconut oil for a neutral flavor. |
Sweetener Comparison in Paleo Baking
Choosing the right sweetener is essential for balancing flavor and managing blood sugar levels. While both maple syrup and honey offer natural sweetness, they differ in their glycemic index (GI) and flavor profiles. Maple syrup generally has a lower GI than honey, meaning it causes a slower and less dramatic rise in blood sugar levels. Honey offers a richer, more complex flavor profile than maple syrup. The choice depends on individual preference and dietary needs. For example, individuals sensitive to blood sugar fluctuations might prefer maple syrup, while those seeking a bolder flavor might opt for honey. Both options are far superior to refined sugars in terms of nutritional value and overall health impact.
Step-by-Step Paleo Granola Recipe
Crafting your own paleo granola allows for complete control over ingredients and sweetness, resulting in a healthier and more flavorful breakfast option than store-bought varieties. This recipe provides a delicious and crunchy granola, perfect for topping yogurt, adding to smoothies, or enjoying as a standalone snack. Remember to adjust sweetness to your preference.
Dry Ingredient Preparation
This initial stage focuses on combining the dry ingredients, ensuring even distribution and preventing clumping during the baking process. Proper measurement is key to achieving the desired texture and flavor profile.
- In a large bowl, combine 2 cups of almond flour, 1 cup of shredded coconut (unsweetened), ½ cup of pumpkin seeds, ½ cup of sunflower seeds, ¼ cup of chopped pecans or walnuts (optional), and 1 teaspoon of sea salt. The almond flour provides a base, while the coconut adds sweetness and texture. The seeds contribute healthy fats and a satisfying crunch. The nuts offer additional flavor and texture complexity, if desired. The salt enhances the overall taste.
Wet Ingredient Incorporation
This step involves carefully incorporating the wet ingredients into the dry mixture. The goal is to evenly coat all the dry ingredients without making the mixture overly wet. Too much liquid will result in a soggy granola.
- In a separate bowl, whisk together ¼ cup of melted coconut oil (or other high-heat oil like avocado oil), 2 tablespoons of maple syrup (or honey), and 1 teaspoon of vanilla extract. The melted coconut oil binds the ingredients and adds richness, while the maple syrup provides sweetness and moisture. The vanilla extract enhances the overall flavor profile.
- Pour the wet ingredients into the bowl with the dry ingredients and gently toss until all the dry ingredients are evenly moistened. Avoid overmixing, as this can lead to a less crunchy granola. The mixture should be evenly coated but not overly saturated.
Baking the Granola
The baking process is crucial for achieving the desired texture and preventing burning. A moderate oven temperature and careful monitoring are essential.
- Preheat your oven to 300°F (150°C). Line a large baking sheet with parchment paper to prevent sticking. Spread the granola mixture evenly onto the prepared baking sheet in a single layer. This ensures even baking and prevents clumping.
- Bake for 20-25 minutes, stirring halfway through. Keep a close eye on the granola during baking. The granola is done when it’s golden brown and crispy. Overbaking will result in a burnt granola. The color should be a consistent light golden brown, indicating even cooking. If some areas are browning faster than others, gently rearrange the granola on the baking sheet.
- Remove the baking sheet from the oven and let the granola cool completely on the baking sheet before breaking it into smaller pieces. Cooling allows the granola to crisp up further and prevents it from becoming sticky. Once cooled, the granola will be easily broken into clusters.
Storage
Proper storage is important to maintain the granola’s freshness and crispness.
- Store the cooled granola in an airtight container at room temperature. This will help prevent moisture absorption and maintain its crisp texture. An airtight container is crucial to preserve the granola’s freshness for longer periods. Ideally, store it in a cool, dry place away from direct sunlight.
Serving Suggestions and Pairing Ideas
This homemade paleo granola is incredibly versatile, lending itself to a multitude of breakfast, snack, and dessert applications. Its nutty, subtly sweet flavor profile pairs beautifully with a wide array of ingredients, enhancing both sweet and savory dishes. The possibilities are truly endless, limited only by your imagination and culinary preferences.
Breakfast Applications
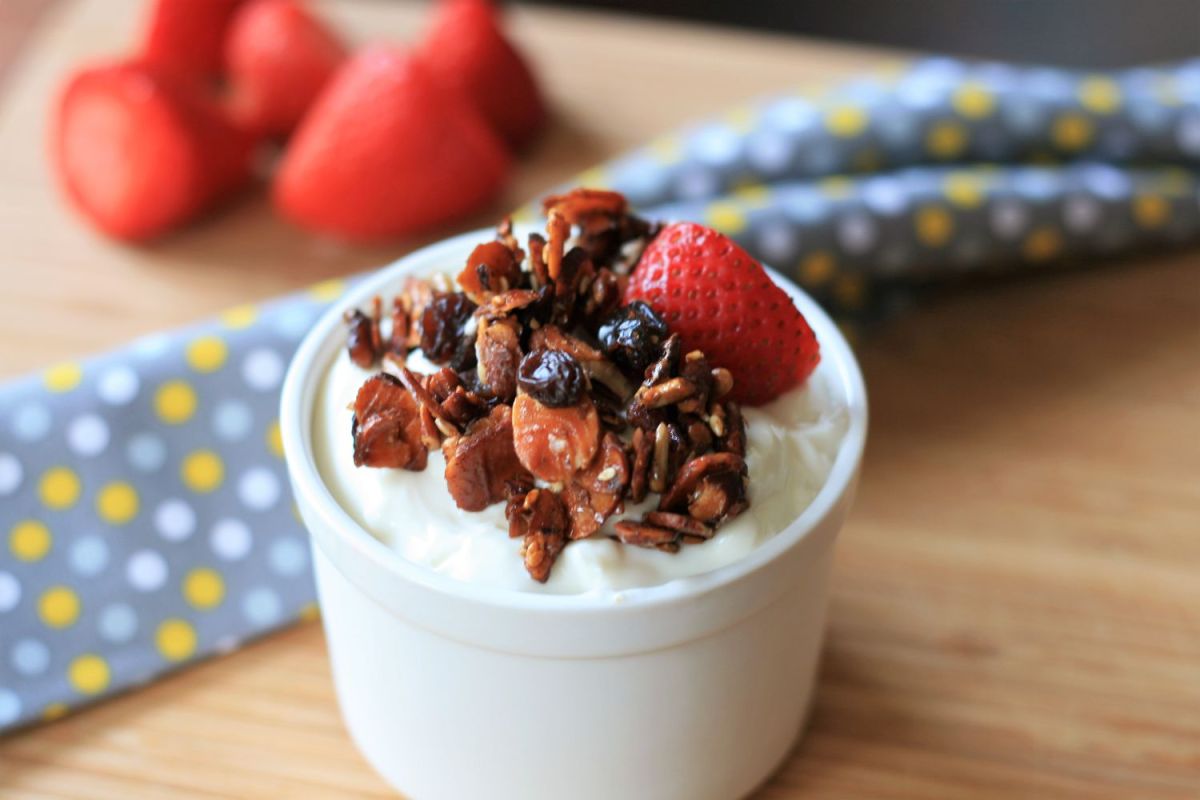
Paleo granola shines as a vibrant and nutritious start to the day. Its crunchy texture and satisfying flavor make it a perfect addition to various breakfast options. Imagine a bowl brimming with creamy coconut yogurt, topped with a generous helping of this homemade granola, and a drizzle of honey or maple syrup for a touch of sweetness. Alternatively, you could sprinkle it over a smoothie bowl, adding a delightful textural contrast to the smooth, blended fruits. A quick and easy breakfast option could involve simply enjoying a handful of granola with a glass of almond milk, providing a complete and balanced start to your day.
Snacking Ideas
This granola is an ideal snack, providing sustained energy and satisfying those mid-afternoon cravings. A small portion, perhaps a quarter cup, offers a crunchy, satisfying snack that’s far more nutritious than many processed alternatives. Pack a small container of granola for a healthy on-the-go snack. You can enjoy it by itself, or pair it with fruits like berries or sliced apples for added flavor and nutrients. A trail mix incorporating the granola with nuts, seeds, and dried fruit makes a perfect energy booster for hiking or other outdoor activities.
Dessert Applications
Beyond breakfast and snacks, paleo granola finds its place in the dessert realm. Imagine incorporating it into homemade paleo muffins or cookies for added texture and a nutty crunch. It can be used as a topping for yogurt parfaits, adding a layer of delightful crunch and sweetness. Consider using it as a crumble topping for baked fruit crisps or cobblers, creating a beautiful golden-brown crust with a delightful textural contrast.
Food Pairing Enhancements
The nutty and subtly sweet flavor profile of this paleo granola complements a wide range of foods. Its slightly sweet taste pairs wonderfully with the tartness of berries like blueberries, raspberries, and strawberries. The crunchy texture contrasts beautifully with creamy textures like coconut yogurt or almond milk. The granola’s natural sweetness is enhanced by the addition of fresh or dried fruits such as bananas, mangoes, or figs. Savory pairings are also possible; its nutty notes harmonize well with the richness of nut butters, providing a satisfying balance of flavors and textures.
Culinary Versatility
The versatility of this homemade paleo granola extends beyond simple additions to breakfast bowls or snacks. It can be incorporated into a multitude of dishes, enhancing their texture and flavor profile. For instance, you could use it as a coating for chicken or fish, creating a crispy, flavorful crust. It could be incorporated into energy bars, adding a satisfying crunch and a boost of nutrients. Consider using it as a topping for salads, adding a unique textural element and a touch of sweetness to the savory greens. The possibilities are truly extensive, limited only by your culinary creativity.
Making your own paleo granola is more than just a recipe; it’s a journey into mindful eating and control over your ingredients. By following this guide, you’ve gained the knowledge and confidence to create a delicious, healthy granola tailored to your preferences. Experiment with different nuts, seeds, and spices to discover your signature blend. Enjoy the satisfying crunch, the wholesome goodness, and the pride of knowing exactly what goes into your bowl each morning. Happy Granola-Making!
FAQ
Can I use coconut oil instead of another oil?
Yes, coconut oil is a great paleo-friendly alternative. It adds a subtle coconut flavor and contributes to the granola’s crispness.
How long does homemade paleo granola last?
Properly stored in an airtight container at room temperature, your homemade paleo granola should last for 2-3 weeks.
Can I add chocolate chips to my paleo granola?
Yes, you can add dark chocolate chips (ensure they are paleo-friendly, with minimal added sugar) for extra flavor and indulgence. Add them towards the end of the baking process to prevent them from melting completely.
What if I’m allergic to nuts?
You can substitute sunflower seeds, pumpkin seeds, or even roasted chickpeas for the nuts in the recipe. Always carefully check ingredient labels to ensure they are nut-free.


