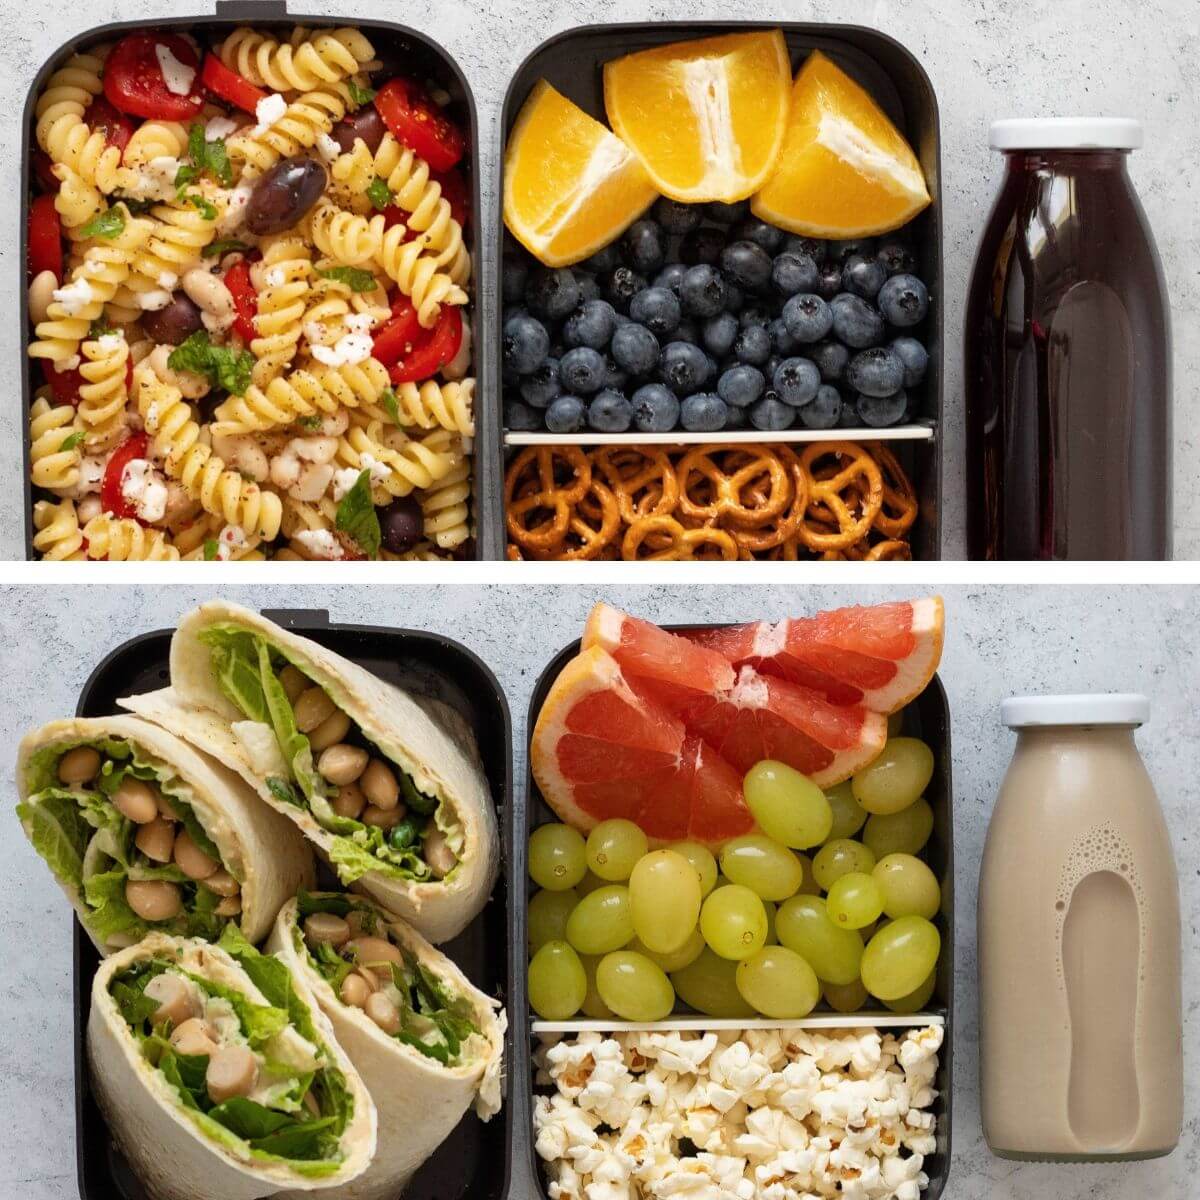
Tired of lunchtime boredom and the daily scramble for a healthy meal? Imagine a week brimming with delicious, diverse lunches, effortlessly prepared ahead of time. This guide unveils the secrets to mastering flexitarian meal prepping, blending the best of vegetarian and meat-inclusive options for a vibrant and satisfying week of midday meals. We’ll navigate the planning process, from crafting a flexible meal plan to assembling visually appealing and nutritionally balanced containers, all while optimizing your time and minimizing kitchen chaos.
Through detailed recipes, smart storage techniques, and helpful tips, you’ll transform your lunch routine from a stressful chore into a delightful anticipation. Discover how to create a symphony of flavors and textures, effortlessly incorporating lean proteins, vibrant vegetables, and wholesome grains into your weekly lunch repertoire. Prepare to say goodbye to lunchtime monotony and hello to a week of flavorful, healthy, and stress-free meals.
Preparing Vegetarian Lunch Components
Creating delicious and nutritious vegetarian lunches for the week requires planning and preparation, but the rewards are well worth the effort. These recipes focus on maximizing flavor and texture while providing a good balance of protein and essential vitamins. Each recipe is designed to be easily prepped in advance and transported for a satisfying and healthy midday meal.
Mediterranean Quinoa Salad
This vibrant salad bursts with fresh flavors and textures, offering a complete protein source from quinoa and chickpeas. The combination of cucumber, tomatoes, and feta cheese provides a refreshing coolness, while the lemon-herb vinaigrette adds a zesty kick.
Ingredients: 1 cup quinoa, cooked; 1 can (15 ounces) chickpeas, rinsed and drained; 1 cucumber, diced; 1 pint cherry tomatoes, halved; ½ cup crumbled feta cheese; ¼ cup chopped fresh parsley; ¼ cup chopped fresh mint; 2 tablespoons olive oil; 2 tablespoons lemon juice; 1 teaspoon dried oregano; salt and pepper to taste.
Instructions: Combine cooked quinoa, chickpeas, cucumber, tomatoes, feta cheese, parsley, and mint in a large bowl. In a small bowl, whisk together olive oil, lemon juice, oregano, salt, and pepper. Pour dressing over the salad and toss gently to combine. Refrigerate for at least 30 minutes before serving to allow flavors to meld.
Nutritional Benefits: This salad is a powerhouse of nutrients. Quinoa provides complete protein, fiber, and iron. Chickpeas offer additional protein and fiber, while the vegetables contribute vitamins A and C, potassium, and antioxidants. Feta cheese adds calcium.
Black Bean and Sweet Potato Grain Bowls
These hearty grain bowls offer a satisfying and flavorful vegetarian option, combining the sweetness of roasted sweet potatoes with the earthiness of black beans and the spice of cumin. Brown rice provides a healthy base, while avocado adds healthy fats and creaminess.
Ingredients: 1 cup brown rice, cooked; 1 large sweet potato, peeled and cubed; 1 can (15 ounces) black beans, rinsed and drained; ½ red onion, thinly sliced; ½ cup chopped cilantro; 1 avocado, diced; 1 tablespoon olive oil; 1 teaspoon ground cumin; ½ teaspoon chili powder; salt and pepper to taste.
Instructions: Preheat oven to 400°F (200°C). Toss sweet potato cubes with olive oil, cumin, chili powder, salt, and pepper. Roast for 20-25 minutes, or until tender. Combine cooked rice, roasted sweet potatoes, black beans, red onion, and cilantro in bowls. Top with diced avocado.
Nutritional Benefits: This bowl provides a good source of complex carbohydrates from brown rice and sweet potatoes, fiber from black beans, and healthy fats from avocado. Sweet potatoes are rich in beta-carotene, which the body converts to vitamin A. Black beans are an excellent source of protein and iron.
Spinach and Artichoke White Bean Wraps
These wraps offer a lighter, yet satisfying vegetarian lunch option. The creamy white bean spread, combined with spinach and artichoke hearts, is wrapped in whole-wheat tortillas for a portable and flavorful meal.
Ingredients: 1 can (15 ounces) cannellini beans, rinsed and drained; 2 tablespoons olive oil; 2 cloves garlic, minced; 1 cup packed fresh spinach; 1 can (14 ounces) artichoke hearts, drained and chopped; ¼ cup grated Parmesan cheese; 2 tablespoons lemon juice; salt and pepper to taste; 4 whole-wheat tortillas.
Instructions: In a food processor, combine cannellini beans, olive oil, garlic, spinach, artichoke hearts, Parmesan cheese, and lemon juice. Process until smooth. Season with salt and pepper. Spread the bean mixture evenly over the tortillas and wrap tightly.
Nutritional Benefits: These wraps provide protein from white beans and fiber from whole-wheat tortillas. Spinach is a good source of vitamins A and K, while artichoke hearts offer antioxidants. The Parmesan cheese adds calcium.
Preparing Meat-Inclusive Lunch Components
Adding lean protein to your meal prep elevates the nutritional value and satiety of your lunches, ensuring you stay energized and focused throughout your workday. These recipes focus on efficiency and minimal cleanup, making meal prepping less daunting and more enjoyable. We’ll cover two delicious and versatile options, highlighting techniques for optimal cooking and storage.
Chicken and Black Bean Quinoa Bowls
This vibrant bowl combines the lean protein of chicken breast with the heartiness of black beans and the nutritional boost of quinoa. The flavors are bright and fresh, perfect for a satisfying and healthy lunch.
- Chicken Preparation: Dice 1.5 lbs boneless, skinless chicken breasts into bite-sized pieces. Season generously with chili powder, cumin, and smoked paprika. Imagine the vibrant orange-red hue of the spices coating the chicken, promising a burst of flavor.
- Cooking the Chicken: Heat 1 tablespoon of olive oil in a large skillet over medium-high heat. Add the seasoned chicken and cook, stirring occasionally, until fully cooked and slightly browned, about 8-10 minutes. The chicken should be juicy and tender, with a slightly crispy exterior. Picture the glistening chicken, releasing its aroma into the kitchen.
- Quinoa and Beans: While the chicken cooks, prepare 1 cup of quinoa according to package directions. Rinse and drain one 15-ounce can of black beans. The quinoa will have a fluffy texture, and the black beans will add a creamy, earthy contrast.
- Assembly: Divide the cooked quinoa and black beans into four meal-prep containers. Top each with an equal portion of the cooked chicken. A sprinkle of fresh cilantro and a squeeze of lime juice adds a final touch of freshness and brightness.
Baked Salmon with Roasted Vegetables
This recipe showcases the delicate flavor of salmon, complemented by the sweetness of roasted vegetables. Baking is an efficient cooking method that requires minimal cleanup and yields moist, flavorful fish.
- Vegetable Preparation: Preheat oven to 400°F (200°C). Chop 1 cup broccoli florets, 1 cup bell peppers (any color), and 1/2 cup red onion into bite-sized pieces. Toss the vegetables with 1 tablespoon olive oil, salt, and pepper. The vegetables will be colorful and fragrant, promising a delicious and healthy side.
- Salmon Preparation: Place four 4-ounce salmon fillets on a baking sheet lined with parchment paper. Drizzle each fillet with 1 teaspoon olive oil and season with salt, pepper, and a squeeze of lemon juice. The salmon will have a glistening surface, promising a tender and flavorful result.
- Baking: Arrange the prepared vegetables around the salmon fillets on the baking sheet. Bake for 12-15 minutes, or until the salmon is cooked through and the vegetables are tender. The salmon will be flaky and moist, with a slightly caramelized exterior. The vegetables will be tender and slightly charred, offering a delicious contrast in texture and flavor.
- Storage: Allow the salmon and vegetables to cool slightly before dividing them into four meal-prep containers. The vibrant colors of the salmon and vegetables will make your lunch appealing and healthy.
Efficient Protein Cooking and Storage
Efficient cooking methods, such as skillet cooking for chicken and baking for salmon, minimize cleanup and maximize flavor. For both recipes, utilizing parchment paper or foil simplifies cleanup significantly. Proper storage is crucial for maintaining freshness. Allow cooked proteins to cool completely before storing them in airtight containers in the refrigerator. Consuming the meal prepped lunches within 3-4 days ensures optimal quality and safety. The airtight containers will help to preserve the flavor and texture of the food, keeping it fresh and appealing for several days.
Assembling and Storing Your Lunches

Efficient meal prepping isn’t just about cooking; it’s about streamlining the process of getting those delicious, healthy lunches into your hands each day. A well-organized assembly system minimizes morning chaos and ensures you consistently enjoy your carefully crafted meals. This section details a simple yet effective method for assembling and storing your flexitarian lunches, maximizing freshness and minimizing waste.
Creating a system for assembling your lunches efficiently involves a thoughtful arrangement of your prepared components and a strategic approach to storage. Imagine a well-stocked pantry, but instead of shelves, you have your refrigerator and lunch containers. Visualizing the process helps create a smooth, repeatable workflow.
Container Selection and Arrangement
Choosing the right containers is paramount. Opt for reusable, leak-proof containers made from BPA-free materials like glass or high-quality food-grade plastic. Consider the size and shape of your components. For instance, a tall, narrow container is ideal for salads, while a shallow, wide container works best for grain bowls. Visualize a layered arrangement: a base layer of grains or salad, followed by a layer of protein, and finally, a layer of vegetables and dressing on top (but stored separately to prevent sogginess). Imagine a vibrant green layer of spinach under a colorful array of roasted vegetables, topped with a generous portion of grilled chicken or chickpeas. This layered approach not only looks appealing but also prevents flavors from mixing prematurely. A small, separate container holds the dressing, to be added just before eating.
Temperature Control and Storage
Maintaining proper temperature is crucial for food safety and freshness. Always refrigerate your assembled lunches immediately after preparation. Aim for a temperature below 40°F (4°C). If using perishable ingredients like cooked meat or dairy, ensure they are thoroughly chilled before packing. Imagine the temperature gradient within your refrigerator: the coldest areas are typically at the back and on the lower shelves. Storing your lunch containers in these zones will ensure optimal freshness. Avoid leaving lunches at room temperature for extended periods, especially during warmer months. This is crucial to prevent bacterial growth and maintain the quality of your meal. Proper storage is the final, critical step in the meal-prep process, preserving both flavor and nutritional value.
Mastering the art of flexitarian meal prepping isn’t just about convenience; it’s about embracing a lifestyle of mindful eating and efficient time management. By following the steps Artikeld in this guide, you’ll unlock a world of culinary creativity, ensuring each lunchtime is a vibrant and satisfying experience. The visually appealing and nutritionally balanced lunches you create will not only fuel your body but also nourish your soul, leaving you feeling energized and ready to conquer the afternoon. So, embark on this culinary adventure and transform your weekly lunch routine into a delightful and healthy habit.
Q&A
Can I freeze these meal-prepped lunches?
While some components might freeze well (e.g., cooked grains, proteins), others like leafy greens and certain sauces may not retain their texture or flavor. It’s best to plan for lunches to be consumed within 3-4 days for optimal freshness.
How long does this meal prep take?
The total time commitment will depend on the chosen recipes and your kitchen efficiency. Expect to dedicate a couple of hours on a weekend to prepare all the components. The assembly process on weekday mornings should take only a few minutes.
What if I don’t like one of the recipes?
The beauty of meal prepping is its flexibility! Feel free to substitute recipes based on your preferences and dietary needs. The guide provides suggestions for modifications and substitutions to suit individual tastes.
Are there any specific containers recommended?
Choose reusable containers that are leak-proof and microwave-safe. Glass containers are a great option for reheating, while BPA-free plastic containers are also suitable. Ensure containers are appropriately sized to avoid overfilling and maintain food quality.


